Sanding Block vs Sanding Sponge: Which Should You Use? (November 2026)
Choose a sanding block for flatter, more even surfaces and a sanding sponge for curves, edges and irregular shapes. The right choice depends on how much support and flexibility your work needs.
On this page (10 sections)
- Sanding block vs sanding sponge: what is the main difference?
- Which tool follows curves and edges better?
- How do grit ranges affect the choice?
- Which sanding sponge pack suits repeated preparation?
- When is a small sanding sponge better?
- Should you sand wood with a block or sponge?
- What about metal, drywall and tile?
- Can you wet sand with a sanding sponge?
- How should you choose between a sanding block and sponge?
- Final verdict: sanding block vs sanding sponge
Choose a sanding block for flatter, more even surfaces and a sanding sponge for curves, edges and irregular shapes. This sanding block vs sanding sponge choice comes down to support, flexibility, grit and the shape of the workpiece.
A sanding block holds abrasive material against a surface with firmer support. A sanding sponge adds a soft foam layer that can bend around contours while still giving you a broad hand-sanding surface.
Both can help with wood, drywall, paint and metal preparation. Your best choice depends on whether the surface needs a straight sanding plane or a tool that can follow its shape.

 Best for broad grit coverage
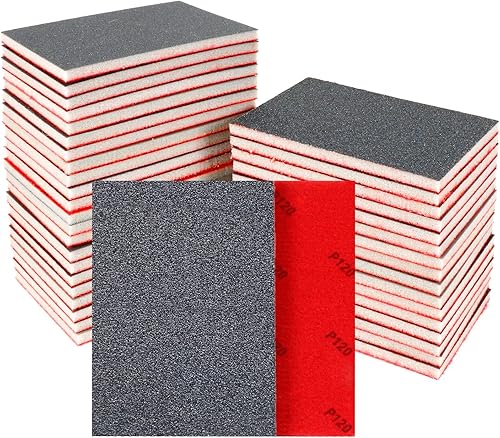
Pukamam 24 PCS Sanding Sponge Block 80-3000
Sanding block vs sanding sponge: what is the main difference?
A sanding block keeps the abrasive flatter, while a sanding sponge flexes around curves and corners. That difference affects how evenly you remove material and how easily you can reach an irregular area.
A rigid block is useful when you want to spread pressure across a flat surface. It can reduce the chance that your fingers press harder in one small spot.
A sponge block has a foam backing that gives as you sand. The flexibility helps on rounded edges, shallow curves, tight corners and surfaces with small changes in shape.
Neither format is automatically better for every job. Use the one that matches the surface rather than choosing only by the word “block” or “sponge.”
For a wider look at hand tools and powered options, see our guide to different types of sanders.
Is a sanding block or sponge better for flat surfaces?
A firmer sanding block is usually the better choice for a broad flat surface. It gives the abrasive more support and helps distribute your hand pressure over a wider area.
This matters on panels, filler repairs and other work where dips or rounded sanding marks would be difficult to hide. Keep the block moving, and avoid pressing harder on one end.
A sanding sponge can still work on flat surfaces. It is useful when the job also includes edges, corners or mild contours, but its flexibility may make it easier to follow an existing low spot instead of leveling it.
Which tool follows curves and edges better?
A sanding sponge follows curves and edges better because its foam backing can flex with the workpiece. That makes it useful for profiles, rounded parts and irregular surfaces.
A rigid block can bridge a curve rather than making full contact across it. On a narrow edge, it may also concentrate pressure if you hold it at an angle.
Use light pressure on a curved area and let the abrasive do the work. Check the surface often so you do not remove more material from one section than another.
The best sanding blocks for auto body work are relevant when a project combines broad panels with curved body shapes. Auto body preparation often needs a mix of firm support and contour control.
The BOSHCRAFT set includes 10 sponge sanding blocks. It has 60, 80, 100, 120, 180 and 220 grits, with 4 pieces at 220 grit and 2 pieces at each of the other listed grits.
Its 3.9 x 2.8 in size gives you a hand-sized surface for general sanding. The foam is flexible, and the blocks are designed for wet or dry use.
You can rinse them clean and reuse them.
This is a practical match for household projects that need several preparation stages. The coarse grits can remove more material, while the finer grits help smooth a prepared surface before painting or finishing.
The trade-off is its limited upper grit of 220. Choose another set if your work regularly needs ultra-fine polishing or a longer progression beyond fine preparation.
How do grit ranges affect the choice?
Choose the grit range based on the work stage, not just the number of pieces. Coarse abrasives remove material faster, while fine abrasives leave a smoother surface with lighter cutting action.
A common sequence starts with the least aggressive grit that can do the job. Move to a finer grit after the large scratches, uneven filler or rough coating have been addressed.
Do not use a very coarse abrasive on a surface that only needs light smoothing. Deep scratches can take extra work to remove with later grits.
A wide grit range helps when one project includes several tasks. A narrower range may be easier to manage when you mostly repeat the same preparation work.
Sanding block vs sanding sponge for finish work
A sanding sponge is useful for finish work when the surface has curves or small details. A firm block is easier to control when the final surface is broad and flat.
For fine work, use light pressure and short passes. Clean the surface between grit changes so loose particles from a coarser abrasive do not create new scratches.
The 24-piece Pukamam set covers 80 through 3000 grit. Its range includes 80, 120, 180, 240, 320, 400, 500-600, 800-1000, 1200-1500, 2000, 2500 and 3000 grit, with 2 pieces of each listed grade or range.
The Pukamam set measures each sanding sponge at 3.93 x 2.75 x 0.19 in. Its aluminum oxide abrasive and flexible foam support wet or dry sanding on wood, metal, paint, plastic and drywall.
The wide range makes it a strong choice when one project may include rough preparation, smoothing and polishing. It also suits buyers who want fine options without adding separate abrasive types.
The trade-off is that many grit choices require careful sorting. Keep the grits arranged in order so you do not accidentally use a coarse sponge during a finishing step.
Which sanding sponge pack suits repeated preparation?
A larger pack of common preparation grits is useful when you repeat sanding on wood, metal, paint or drywall. You get more pieces in the ranges used for removing roughness and preparing a surface.
The 36-piece Pukamam set includes 6 pieces each of 80, 120, 180, 240, 320 and 400 grit. Each sponge measures 3.94 x 2.76 x 0.2 in.
This set is aimed at the coarse-to-medium range rather than ultra-fine polishing. Its aluminum oxide abrasive and flexible foam are suited to wet or dry sanding on furniture, wood, paint, metal, plastic and drywall.
The larger quantity can make sense for several repairs, refinishing jobs or routine shop work. Having multiple pieces of the same grit also reduces the need to stop and clean one abrasive before moving to another task.
Choose the 24-piece set instead if you need grits above 400. Choose this 36-piece set when repeat preparation matters more than polishing range.
Our guide to the best sanding block and sandpaper sets can help if you want to compare a broader mix of hand-sanding formats.
When is a small sanding sponge better?
A small sanding sponge is better when you need control around model parts, narrow edges or small curved surfaces. A large block can cover too much area and make detail work harder.
The stedi sanding sponge is intended for model Gundam building and works with wood, plastic and resin. Its 0.79 x 0.79 x 0.08 in dimensions suit small contact areas.
The stedi abrasive uses aluminum oxide and supports wet or dry use. The 400-600, 600-800 and 1000-1200 ranges give a fine progression for detail work.
The package contents for the 400 to 1200 set include 30 sheets, with 10 pieces in each listed range. The sponge can be washed and reused.
This is not the right first choice for removing heavy material or sanding a large panel. Its small size covers less area, and the grit range starts at 400 rather than at a coarse preparation grade.
Should you sand wood with a block or sponge?
Use a sanding block for broad, flat wood and a sanding sponge for edges, profiles and uneven wood. Select the grit according to whether you are removing damage, smoothing the surface or preparing for a coating.
A block can help keep your sanding plane straight across a panel. Use steady strokes with the grain when the surface and finish call for it.
A sponge is easier around routed edges, rounded trim and shallow curves. Its flexibility can help maintain contact where a rigid block would touch only at a few points.
For more woodworking-specific choices, see our guide to the best sanding block for woodworking. For long, straight workpieces, a long sanding block may give better reach and support.
What about metal, drywall and tile?
Choose the abrasive format by the shape and surface condition of the material. Metal may need a suitable grit progression, drywall benefits from controlled pressure, and tile requires an abrasive made for the tile surface.
A sanding sponge can work on metal preparation when the abrasive and grit suit the task. Avoid pressing so hard that the flexible backing changes the contact pattern.
For metal-specific options, see the best sanding block for metal. Drywall work also benefits from checking the surface often so you do not create a low spot around filler.
Tile is a separate case. A diamond abrasive may be more suitable than a general sanding sponge, so review the best sanding block for tile before choosing a tool for tile edges or surfaces.
Can you wet sand with a sanding sponge?
Wet sanding can reduce dust and extend abrasive use when the sponge is designed for wet and dry work. Use only the amount of water needed for the task, and keep surrounding materials protected.
Wet sanding is useful when dust control matters or when you want a finer surface treatment. It also changes how the abrasive feels, so use light pressure and check the surface regularly.
Rinse the sponge after use and let it dry according to the care needs of the material. Do not assume that every sanding block can be submerged.
Our guide to the best wet sanding block covers options for work where water is part of the sanding process.
How should you choose between a sanding block and sponge?
Pick a sanding block when flatness and firm support matter most. Pick a sanding sponge when flexibility, edge access and contour contact matter more.
Use this simple rule:
- Choose a firm block for broad flat panels and leveling work.
- Choose a sponge for curves, profiles, corners and irregular surfaces.
- Choose a coarse-to-medium range for material removal and surface preparation.
- Choose a fine range for smoothing, polishing and model details.
- Choose wet and dry abrasives only when the specific format supports both methods.
The BOSHCRAFT set is the most balanced choice for mixed household sanding from 60 to 220 grit. The 24-piece Pukamam set is better when you need a very broad range through 3000 grit.
The 36-piece Pukamam set favors repeat preparation in common 80 to 400 grits. The stedi sponge is the focused choice for small model parts and fine sanding from 400 to 1200 grit.
Final verdict: sanding block vs sanding sponge
Choose a sanding block for firm, even support on flat surfaces, and choose a sanding sponge for flexible contact on curves and edges. Then match the grit range to the amount of material you need to remove.
For general household work, choose the BOSHCRAFT set. For broad grit coverage, choose the 24-piece Pukamam set.
For repeated preparation, choose the 36-piece set, and for small model details, choose the stedi sanding sponge.
Frequently asked questions
Is a sanding block better than a sanding sponge?
A sanding block is better when you need firm support across a flat surface, while a sanding sponge is better for curves, edges and irregular shapes. A rigid block can help keep a broad area flat.
Flexible foam follows contours and is easier to hold around profiles.
Can you use a sanding sponge on flat wood?
Yes, a sanding sponge can sand flat wood, especially for light preparation and work around edges. Keep your pressure even and check the surface often.
For a large flat panel where maintaining a straight plane matters, a firm sanding block gives more consistent support.
Can sanding blocks be used wet?
Some sanding blocks and sanding sponges are made for wet and dry use. Wet sanding can reduce dust and help extend abrasive life, but confirm that the specific abrasive supports water before using it.
Dry the abrasive and work area appropriately after wet sanding.
What grit should you use with a sanding sponge?
Use a coarse grit for faster material removal, a medium grit for surface preparation and a fine grit for smoothing. The right starting point depends on the surface and the finish you need.
Move through grits gradually instead of jumping from very coarse to very fine.