How to Use a Hand Sander
Use light, even pressure and sand with the wood grain. Start with a coarse grit only when needed, change abrasives as they wear, and finish with finer grits.
On this page (12 sections)
- What is a hand sander used for?
- How should you prepare before sanding?
- How do you choose the first grit?
- How much pressure should you use with a hand sander?
- Which direction should you sand?
- How do you use a hand sander on flat wood?
- How do you change abrasive grits?
- Can you use a hand sander wet?
- How do you sand edges and corners?
- What should you do after sanding?
- How do you use a hand sander safely and efficiently?
- When hand sanding no longer gives enough speed or control, choose the next tool based on the surface and shape. A hand block remains the better choice when edge control, low material removal, and careful finishing matter most.
Here's how to use a hand sander: keep the sanding block flat, use light pressure, and move with the grain on wood. Start with the coarsest grit needed for the surface, remove its scratches with the next grit, and finish only as fine as the project requires.
A hand sander gives you control over edges, small surfaces, profiles, and areas where a powered sander would remove too much material. For an overview of different types of sanders, compare the tool's motion and surface area before choosing a method.
What is a hand sander used for?
A hand sander holds an abrasive against a surface so you can smooth, shape, or prepare it by hand. The term can describe a sanding block, sanding sponge, or hand tool that clamps or grips sandpaper.
A flat block keeps the abrasive from following every dip under your fingers. That helps produce a more even surface and reduces the finger grooves that can appear when you sand with loose paper.
If you want the basic parts and common uses explained first, read what is a hand sander. The right shape depends on whether you are sanding flat wood, a curve, filler, paint, or a narrow corner.
How should you prepare before sanding?
Prepare the workpiece, abrasive, lighting, and dust control before you begin. Secure the material so it cannot slide, and remove dirt or loose debris that could create deeper scratches.
Choose an abrasive that covers the sanding face without folding under the block. A paper-backed block, flexible sponge, or foam block can each work, but the tool should stay flat and comfortable in your hand.
Wear eye protection and use suitable dust control for the material. Sanding old paint, filler, drywall, or metal may need extra ventilation and a properly selected respirator.
Which hand sander helps with basic prep?
The BOSHCRAFT 10 Pcs Sanding Sponge Set suits general wood, drywall, metal, primer, and filler preparation. It includes 10 sponge blocks across 60, 80, 100, 120, 180, and 220 grits, with 4 pieces at 220 grit and 2 pieces at each other grit.
Each block measures 3.9 x 2.8 in, and the sponge is designed for wet or dry sanding. Rinse the blocks after use when appropriate, let them dry, and keep the grit markings visible so you can select the next abrasive quickly.
This set is useful when you need several common grits for small projects. It does not replace a shaped block when a curved body panel or recessed crease needs more specific support.
For another comparison of hand tools and abrasives, see Best Sanding Block and Sandpaper Sets.
How do you choose the first grit?
Choose the least aggressive grit that will remove the problem. Use a coarser abrasive for heavy scratches, uneven filler, or old finish, and start finer when the surface is already fairly smooth.
A practical wood progression is 80 or 100 grit for leveling, 120 grit for general smoothing, then 150, 180, or 220 grit for the final surface. You don't always need every step, but large jumps can leave scratches that the next grit cannot remove efficiently.
For a surface with only light roughness, begin at 120 or 150 grit. Starting with 60 grit can create deep scratches that take extra work to erase.
How much pressure should you use with a hand sander?
Use light, even pressure and let the abrasive do the work. Hold the block with enough force to keep it stable, but don't push your fingertips into the surface.
Excess pressure can flatten a soft area faster than a hard area and create dips. It can also clog the abrasive, increase heat during dry sanding, and make you press even harder when the abrasive becomes dull.
Use both hands on a large block when that helps keep it level. On a small part, shorter strokes and a relaxed grip usually give you better control than squeezing tightly.
Which direction should you sand?
Sand with the wood grain for the final passes. Long, steady strokes usually make the scratch pattern easier to read and reduce visible cross-grain marks.
You can sand across the grain briefly when you need to level a rough spot or remove a finish. Follow that step with strokes along the grain using the same grit until the cross-grain marks disappear.
On metal, drywall, filler, and painted surfaces, direction depends more on the shape and goal. Keep the block flat and use overlapping strokes so one area does not receive much more sanding than the rest.
How do you use a hand sander on flat wood?
Place the abrasive flat on the surface before moving it. Push the block in overlapping strokes, lift it at the end of a pass, and avoid rocking the block onto an edge.
Sand a small test area first, especially near a veneer, softwood edge, or repaired section. Check the surface under bright, angled light because scratches and low spots can be difficult to see from directly above.
Keep the block moving instead of scrubbing one tiny area with heavy pressure. Stop often to remove dust and inspect the scratch pattern rather than sanding by feel alone.
What hand sander suits curves and body panels?
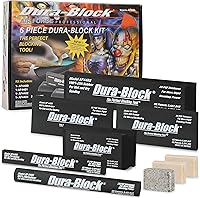
The Dura-Block Set 6pc suits automotive bodywork and surfaces that need a flexible block shape. The set includes blocks for large panels, smaller areas, rounded sections, recessed creases, and scruffing work.
The set includes a standard block measuring 11 x 1.4 x 0.8 in, a 2/3 block measuring 11 x 2.4 x 1.2 in, a 1/3 block measuring 5.5 x 2.4 x 1.5 in, a round block measuring 11 x 1.3 in diameter, and 2 scruff blocks measuring 5.4 x 2.5 x 0.6 in.
It is designed for wet or dry use and uses closed-cell EVA foam that does not soak up water like a sanding sponge. Use sticky-backed PSA sandpaper tape with the block when needed, and remember that the tape is not included.
For a broader auto body comparison, see Best Sanding Blocks for Auto Body Work.
How do you change abrasive grits?
Change grits after the current abrasive has done its job, not just because a certain number of strokes has passed. The surface should show a consistent scratch pattern with no deeper marks from the previous grit.
Wipe or vacuum away dust before moving to a finer grit. One coarse grain left on the workpiece can create a long scratch that makes the next step seem ineffective.
Use fresh abrasive when the surface stops cutting, the paper clogs, the sponge tears, or the block leaves uneven marks. Cleaning or rinsing can extend the useful life of some sanding sponges, but a worn abrasive cannot be restored by adding pressure.
Can you use a hand sander wet?
Use wet sanding only when the abrasive and workpiece are suitable for it. Water can reduce airborne dust and help some abrasives cut more evenly, but it can also swell wood, stain unfinished surfaces, or create rust on metal.
The Pukamam 24 PCS Sanding Sponge Block 80-3000 suits readers who need a wide grit range for wood, metal, furniture, paint, plastic, drywall, and auto body preparation. It includes 24 sponge blocks covering 80, 120, 180, 240, 320, 400, 500-600, 800-1000, 1200-1500, 2000, 2500, and 3000 grits, with 2 pieces at each range.
Each block measures 3.93 x 2.75 x 0.19 in. The flexible foam shape can follow curves and tight corners, while the sponge layer helps buffer vibration during hand sanding.
Use a light touch with the finer grits, especially from 800 grit upward. For a related woodworking choice, compare the best sanding block for woodworking before starting a larger project.
How do you sand edges and corners?
Sand edges with shorter strokes and less pressure than you use on a broad flat area. A block can round over an edge quickly if you rock it or make repeated passes on one corner.
Keep the block supported by the surface whenever possible. For a narrow edge, use an abrasive that fits the area and make a few controlled passes before checking the shape.
Use a smaller or shaped block for inside corners and curves. A detail tool may suit tight corners better than a broad block, so compare detail sander vs orbital sander when hand sanding is too slow for the shape.
What should you do after sanding?
Remove all loose dust before inspecting or applying a finish. Vacuum the surface, wipe it with a suitable dry cloth, and check under angled light for deep scratches, swirl marks, glue spots, and uneven areas.
Don't use a finer grit to hide a deep scratch without first removing the scratch with the current grit. Return to the needed step, sand until the marks match, then continue through the progression.
For floors, large panels, or heavy stock removal, a powered tool may be more suitable. Read how to use a drum sander on wood floors or compare belt sander vs belt grinder before choosing a faster method.
How do you use a hand sander safely and efficiently?
The best method for how to use a hand sander is simple: secure the work, keep the block flat, use light pressure, follow the grain on wood, and change grits only after the scratch pattern is ready.
Choose BOSHCRAFT when you want common grits for general prep, Dura-Block when shaped EVA blocks suit automotive panels, and Pukamam when you need a broad wet or dry range from 80 to 3000 grit. Store abrasives clean and dry, and inspect the surface after every grit change.
When hand sanding no longer gives enough speed or control, choose the next tool based on the surface and shape. A hand block remains the better choice when edge control, low material removal, and careful finishing matter most.
Frequently asked questions
How much pressure should you use with a hand sander?
Use light, even pressure that keeps the sanding block flat without digging into the surface. Let the abrasive do the cutting.
Pressing harder can create low spots, clog the abrasive, and make your hand tire faster.
Should you sand wood with or against the grain?
Sand wood with the grain for the final passes. Cross-grain sanding can remove material faster, but it leaves scratches that are harder to hide.
Use it only when needed for leveling, then remove those marks with progressively finer grits along the grain.
When should you change sandpaper?
Change the abrasive when it stops cutting, becomes clogged, tears, or leaves uneven scratches. A fresh abrasive often works better than adding pressure.
Move to the next grit only after the previous scratch pattern is gone.
What grit should you use first on wood?
Start with 80 or 100 grit for noticeable roughness, tool marks, or old finish that needs removal. Use 120 grit for a smoother starting surface, then progress through 150 or 180 grit before a finish when the surface is ready.