How to Use a Ryobi Router Table
To use a Ryobi router table, mount the router securely, set the bit height, align the fence, and feed the workpiece slowly against the bit's rotation. Make test cuts in scrap wood before routing the final piece.
On this page (11 sections)
- What should you check before using a Ryobi router table?
- How do you mount the Ryobi router under the table?
- How do you set the fence on a Ryobi router table?
- How do you set router bit height and depth?
- How do you feed wood across a Ryobi router table?
- Can a router table make repeat narrow strips?
- What if you only need light-duty detail work?
- How do you manage dust and cleanup?
- How does a router table compare with other saw tools?
- How do you store and maintain the setup?
- What is the safest basic Ryobi router table routine?
To use a Ryobi router table, secure the table, mount the router, set the bit height, align the fence, and feed the workpiece slowly against the bit's rotation. Make a shallow test cut first, then adjust the height or fence before routing the final piece.
A router table turns a handheld router into a fixed cutting station. That can make edge profiles, grooves, rabbets, and repeated cuts easier to control, but only when the workpiece stays flat and your hands remain clear of the bit.
What should you check before using a Ryobi router table?
Before using a Ryobi router table, check the router, bit, table, fence, power switch, and work area. The table should sit securely, the router should be held firmly, and the bit should be clean and properly tightened.
Read the instructions for your specific Ryobi table and router before setup. Router tables vary in mounting plates, height adjustment, fence locks, guards, and switch arrangements.
Clear the table of loose tools and scraps. Wear eye protection, keep sleeves and cords away from the bit, and disconnect power whenever you install or remove a bit.
How do you choose a router bit for a Ryobi table?
Choose a bit that matches the cut you want and fits the router's collet. Use a bit with a sharp cutting edge, inspect it for damage, and insert the shank fully without bottoming it out in the collet.
A straight bit suits grooves and dados, while an edge-profile bit shapes the outside of a board. Start with a shallow cut even when the final profile is deeper.
If you are new to routers, our guide to wood routers for woodworking explains the basic router types, bit choices, and features to compare.
How do you mount the Ryobi router under the table?
Mount the Ryobi router according to the table's instructions, then confirm that the router cannot shift when the bit spins. Tighten the mounting hardware evenly and make sure the collet and bit remain accessible for safe changes.
Unplug the router before mounting it. Set the router's speed only within the range recommended for the bit and router, since larger bits often need a slower setting than smaller ones.
Check that the bit clears the table opening. Rotate the bit by hand while the router is unplugged to confirm that it does not touch the insert, plate, fence, or guard.
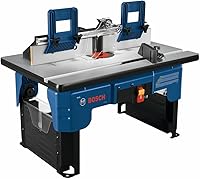
A portable table can suit a small shop or occasional work. The BOSCH RA1141 26 in. x 16-1/2 in. has a laminated MDF top, folding legs, a tall fence, 2 adjustable feather boards, a starter pin and guard, onboard storage, and a 2-1/2 in. vacuum hose port.
The Bosch table has a 15 A corded-electric setup and a 26 in. x 16-1/2 in. laminated MDF top. Its click router mounting system is intended to make mounting and bit changes easier, while the bit-height gauge can help with repeatable setup.
Choose it if you want a larger portable work surface and built-in support features. Its 31.6 lb weight may be less convenient to move often, so plan where you will store and use it.
For more table features to compare, see best router table for woodworking. If you want a different setup example, how to use bosch router table covers another fixed-table workflow.
How do you set the fence on a Ryobi router table?
Set the fence so it supports the workpiece close to the bit without touching it. Both fence faces should be aligned, locked firmly, and positioned for the amount of material you want to remove.
For an edge cut, place the fence to expose only the needed part of the bit. For straightening an edge, see router table as a jointer.
For a groove or dado, use a straight bit and set the fence from a measured reference edge.
Use a straightedge to check that the fence faces are in line. Lock the fence, then push a scrap board across the table by hand while the router remains unplugged to check for catches or unwanted gaps.
A feather board can press the workpiece against the fence and table when the table supports one. It should add steady pressure without making the board hard to feed.
How do you set router bit height and depth?
Set the bit height with the router unplugged, then measure from the table surface to the cutting edge or use a scrap test piece. Raise the bit in small steps when the cut is deep or the profile removes a lot of material.
Make the first test cut on scrap from the same type and thickness as the project stock. Check the profile, depth, tear-out, and fit before changing the fence or bit height.
For repeated work, record the fence position and bit height. Do not rely on a visual estimate when a small change can affect a joint or edge profile.
How do you feed wood across a Ryobi router table?
Feed the workpiece right to left across the bit when the bit is above the table and turning in the usual direction. Keep the board flat against the table and pressed lightly against the fence.
Use a steady feed rate. Pushing too quickly can leave an uneven cut, while forcing the board too slowly can burn the wood or produce excess marks.
Keep both hands on the safe side of the bit. Use push blocks or another approved aid when the workpiece is narrow, and never reach over the cutter while the router is running.
Make several shallow passes for a deep profile. Stop the router before removing the workpiece from a setup or checking the cut.
Can a router table make repeat narrow strips?
A router table can guide some repetitive work, but a thin-rip jig is intended for narrow strip cuts rather than ordinary edge routing. Use an accessory only when its slot, guide, and workpiece requirements match your table.
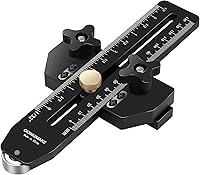
The GOINGMAKE Thin Rip Jig Table Saw Jig is a hand-powered aluminum-alloy guide for repetitive narrow strips. It fits 3/8 in x 3/4 in T slots, U-shaped slots, and 1/4 in x 3/8 in T slots, with an adjustable range from 2-5/8 in to 8 in and cuts as thin as 1/32 in.
Its one-way roller bearing is designed to let the workpiece move forward while helping prevent kickback. The guide has inch and millimeter laser scales, a zero-adjustment design, and a 490 g aluminum-alloy body.
Check the table slot before using it. This jig is for repeat thin-strip work, so it is not a substitute for a router fence when you are shaping an edge or cutting a groove.
What if you only need light-duty detail work?
A compact attachment can suit small, light-duty shaping, grooving, slotting, edging, or sanding tasks when you use the matching rotary tool. It does not replace a full router table for large stock or heavy cuts.
The Dremel 231 Portable Rotary Tool Router Table is an 8 in x 6 in attachment for Dremel models 100, 200, 3000, 4000, 8220, 8240, 8250, and 8260. It has a 3-way adjustable fence, a depth adjustment screw, and a fixed base.
The Dremel 231 weighs 975 g and mounts to a tabletop workspace. Its smaller surface can help with detail pieces, but it gives you less room for large boards than a full-size router table.
Choose it when your projects are small and your compatible Dremel rotary tool is already part of your setup. Choose a full router table when you need more support for long or wide stock.
How do you manage dust and cleanup?
Connect dust collection only when the table and router support the hose connection, and keep the hose clear of the workpiece. The Bosch table includes a 2-1/2 in. vacuum hose port, which can help direct dust away from the cutting area.
A dust port does not remove the need for eye protection or cleanup. Empty the collector as needed, brush dust away after unplugging the router, and inspect the fence and insert for buildup.
Keep the table surface clean so boards slide evenly. Wax or other surface treatments should be used only if the table and finish instructions allow them.
How does a router table compare with other saw tools?
A router table shapes and cuts wood with a spinning router bit, while saws remove material with a toothed blade. If you are choosing between tools, How Does a Miter Saw Differ from a Table Saw? explains how their cutting jobs differ.
A table saw is often chosen for long straight cuts, while a router table suits edge profiles, grooves, and other bit-shaped cuts. What Is the Difference Between a Circular Saw and a Table Saw? covers another useful comparison.
A handheld trim router can be easier for small edge work because you move the tool instead of the board. For that workflow, see ryobi trim router how to use.
How do you store and maintain the setup?
Store the router table dry and keep the fence, insert, guard, and mounting hardware together. Unplug the router before cleaning, changing bits, or adjusting the fence.
Inspect bits before each use and replace damaged bits. Check that mounting screws, fence locks, and table supports remain secure before starting another cut.
If you need a dedicated support for a larger setup, compare best router table stand before choosing a stand. A stable working height can make it easier to keep the board flat and maintain control.
What is the safest basic Ryobi router table routine?
The safest basic routine is unplug, mount, measure, test, lock, then route. Set the fence and bit for a shallow cut, keep the board flat, feed against the bit's rotation, and make more than one pass when needed.
Choose the Bosch table for a larger portable surface and built-in support features. Choose the GOINGMAKE guide for compatible repeat thin-strip work, or the Dremel table for small light-duty detail projects with a matching rotary tool.
Check the exact Ryobi table and router instructions before using any guard, mounting plate, switch, feather board, or bit-height control. That final check matters because table designs and router mounts can differ.
Frequently asked questions
How do you use a Ryobi router table safely?
Secure the table and router, install the correct bit, set a shallow first pass, and keep both hands away from the cutter. Feed the wood against the bit's rotation, use the fence or starter pin as intended, and make several light passes instead of forcing one deep cut.
Which way do you feed wood on a router table?
Feed the workpiece from right to left when the bit is above the table and rotates in the usual direction. This keeps the cut against the bit's rotation and gives you control.
If the wood tries to pull forward, stop and check the feed direction, fence position, and setup.
How high should a router bit be above the table?
Set the bit only high enough to make the planned cut, then use a scrap test piece to check the profile. For a deep edge or groove, raise the bit in small steps and make multiple passes.
The router and bit instructions take priority over a general height rule.
Can you use a router table for small pieces?
Use extra care with small pieces because your hands get closer to the bit. A push block, feather board, starter pin, or other approved guide can improve control when the table and router support it.
Do not route a piece that cannot stay flat and stable.