How to Use a Router Table
A router table works best when you secure the router, set the bit height, align the fence, and feed the workpiece against the bit's rotation. Use light passes, steady pressure, and eye protection for controlled results.
On this page (10 sections)
- What do you need before using a router table?
- How do you set up a router table?
- How do you choose the bit height?
- Which way do you feed wood on a router table?
- How do you use the fence and feather boards?
- How do you make common router-table cuts?
- Can a thin rip jig help at a router table?
- How do you manage dust and finish the cut?
- What is the simplest router-table setup?
- What should you remember from a how to use a router table video?
A router table is used by mounting the router below a table, setting the bit height, aligning the fence, and feeding the workpiece against the bit's rotation. The table supports the stock while the fence and feather boards help guide it through a controlled cut.
This guide explains how to use a router table video lesson in practical steps. It also covers table setup, bit selection, feed direction, shallow passes, and the limits of compact router tables.
What do you need before using a router table?
You need a stable table, a compatible router, the correct router bit, eye protection, hearing protection, and a way to keep the workpiece against the fence. A push block, feather boards, or starter pin may help with specific cuts, but they don't replace careful hand placement.
Read the router and table instructions before mounting the tool. Check that the collet is tight, the bit is fully seated, the switch is off, and the power cord is clear of the work area.
If you're still choosing a router, our guide to wood routers for woodworking explains the difference between common router types and uses.
How do you set up a router table?
Set up the table on a stable surface, mount the router securely, install the bit, and adjust the fence before connecting power. The router should stay firmly attached while the bit turns, and the table should not shift when you press stock against the fence.
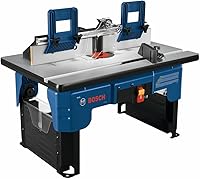
A table with folding legs can suit a small shop where storage matters. The BOSCH RA1141 26 in. x 16-1/2 in. has folding legs, a laminated MDF top, a tall fence, 2 adjustable feather boards, a starter pin and guard, and a 2-1/2 in. vacuum hose port.
The Bosch table is a practical match for woodworkers who want a preassembled benchtop setup. Its 15 A corded-electric design and 26 in. x 14.5 in. dimensions suit a dedicated work surface, while its 31.6 lb weight is worth considering if you move it often.
For more buying context, compare the features in Best Router Tables for Woodworking. A stand can also make the table easier to position, and Best Router Table Stands covers that choice.
How do you mount the router?
Turn off and unplug the router before mounting it. Follow the table's mounting method, check that the router sits level, and confirm that the bit can pass through the opening without touching the insert or plate.
Raise or lower the bit with the router's height adjustment. If the table has a height gauge, use it as a starting point, then confirm the bit position with a scrap piece of the same thickness.
A router table designed for a specific router may need a different mounting method. If you use a Ryobi tool, see how to use a Ryobi router table.
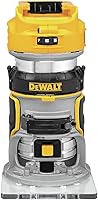
For DeWalt tools, the best router table for DeWalt router can help you compare fit and setup needs.
How do you choose the bit height?
Choose the bit height by matching the cutting edge to the profile you want, then test it on scrap wood. Start with a shallow exposure and raise the bit gradually if the profile needs more depth.
For an edge roundover, the bearing should contact the edge while the cutting blades remove only the intended material. For straightening an edge, see router table as a jointer.
For a groove, measure from the table surface or use a guide mark so the cut lands in the right place.
Do not make a full-depth cut in one pass when a bit removes a lot of material. Several lighter passes reduce strain and make it easier to correct the height before cutting the finished piece.
Should the router bit face up or down?
The bit is installed in the router below the table, so its cutting edges rise through the table opening. The visible direction can feel different from handheld routing, which is why feed direction matters.
A spiral bit can also affect chip removal. Read Upcut vs Downcut Spiral Router Bits: Which Should You Use? before choosing one for grooves, pockets, or edge work.
Which way do you feed wood on a router table?
Feed the workpiece from right to left while facing the fence. This direction keeps the bit's rotation pushing the stock toward the fence instead of pulling it away from you.
Keep the workpiece flat on the table and pressed against the fence. Use steady pressure with both hands where safe, and keep your fingers well away from the bit and the opening.
Do not pull the stock backward through the cut. If you need to stop, switch off the router and wait for the bit to stop before moving the workpiece.
How do you use the fence and feather boards?
Set the fence close enough to support the workpiece while leaving the cutter exposed only as much as the cut requires. The fence faces should be aligned with each other so the stock does not catch on a step.
Feather boards can apply light pressure toward the fence or table. They are useful for repeatable feeding, but they should not make the workpiece difficult to move.
A tall fence helps support taller stock. Adjust the fence and feather boards before powering on, then test the feed path with the router unplugged.
How do you make common router-table cuts?
Make a test cut first, then use light passes for the finished piece. The correct method depends on the bit, grain direction, stock size, and whether the cut is on an edge or across the surface.
For a roundover, keep the edge against the fence or bearing and move at a steady pace. For a groove or dado, use the fence to position the cut and make multiple passes if the groove is deep.
For curved workpieces, a starter pin and guard can help support the initial contact. Keep the stock controlled throughout the cut and avoid forcing a curve into the bit.
A small attachment can suit light-duty detail work. The Dremel 231 Portable Rotary Tool Router Table is an 8 in. x 6 in. table that converts compatible Dremel rotary tools into a bench-mounted shaper for slots, edges, grooves, and sanding.
The Dremel 231 fits models 100, 200, 3000, 4000, 8220, 8240, 8250, and 8260. Its 3-way adjustable fence and depth adjustment screw suit small workpieces, but its compact format is not a substitute for a full-size router table on larger stock.
Can a thin rip jig help at a router table?
A thin rip jig can help with repeat narrow strips when the table and track accept its size. It is a positioning guide, not a replacement for a router table fence, bit guard, or safe feed technique.
The GOINGMAKE Thin Rip Jig Table Saw Jig fits 3/8 in. x 3/4 in. T slots, U-shaped slots, and 1/4 in. x 3/8 in.
T slots. It has an aluminum alloy body, a one-way roller bearing, zero-adjustment design, laser-engraved metric and inch scales, and an adjustment range from 2-5/8 in. to 8 in.
This jig suits woodworkers who need consistent thin strips and have a compatible track. Its stated minimum strip size is 1/32 in., but the workpiece, cutter, and machine setup still determine whether a cut is appropriate.
Use a separate safety plan for every operation. What Does Resawing Mean in Woodworking? explains a different way to produce thin stock, so don't treat a router-table jig as a universal resawing tool.
How do you manage dust and finish the cut?
Connect dust collection if your table and vacuum support it, and clear chips only after the router is unplugged. Dust collection can improve visibility around the bit, but it does not remove the need for eye protection or a clean work area.
Inspect the edge after each pass. If you see burn marks, tear-out, or an uneven profile, check the feed speed, bit sharpness, fence alignment, and depth rather than forcing the next pass.
A router table handles edge profiles and guided cuts well, but it is not a replacement for every saw operation. How Does a Miter Saw Differ from a Table Saw? can help you choose the right machine for crosscuts, long rip cuts, and angle work.
What is the simplest router-table setup?
The simplest setup is a stable table, a secure router mount, a sharp compatible bit, a correctly aligned fence, and a scrap test cut. Set the bit height low, feed right to left, and raise the bit or repeat the pass only when the test confirms the position.
Choose the BOSCH RA1141 when portability and table support matter. Choose the GOINGMAKE jig when repeat thin strips match your table's track, and choose the Dremel 231 when your projects are small, light-duty, and built around a compatible Dremel rotary tool.
The safest routine is to unplug before every adjustment, use light passes, keep the stock against the fence, and wait for the bit to stop before clearing chips.
What should you remember from a how to use a router table video?
A useful how to use a router table video should show secure mounting, bit-height adjustment, fence alignment, feed direction, and controlled passes. Watch for the same details when practicing: the workpiece stays supported, the feed remains steady, and your hands stay clear of the cutter.
Start with scrap wood and a simple edge profile. Once the setup feels controlled, move to the finished piece and keep checking the cut after each shallow pass.
Frequently asked questions
How do you use a router table safely?
Secure the router and table, install the correct bit, set the height, align the fence, and use push blocks or feather boards when suitable. Feed the workpiece against the bit's rotation with steady pressure, take light passes, and keep your hands away from the cutter.
Which direction do you feed wood on a router table?
Feed the wood from right to left when standing in front of the router table and facing the fence, so the bit pushes the workpiece against the fence. This is the usual conventional feed direction.
A climb cut can pull the workpiece forward and should not be used as a normal feed method.
Can a router table cut grooves and edges?
Yes, a router table can cut grooves, rabbets, dados, roundovers, and other edge profiles when you use the right bit and set the height carefully. Make several shallow passes instead of removing too much material at once, especially with hardwood or a large bit.
Do you need a router table for woodworking?
You don't need a router table for every routing task, but it can improve control when shaping narrow stock, routing repeated edges, or guiding work against a fence. A handheld router remains useful for large panels, stopped grooves, and work that cannot safely fit on a table.