How to Use a Circular Saw Guide Rail
Align the guide rail’s cutting edge with your marked line, secure it, and keep the saw’s base against the rail through the cut. Check saw compatibility and blade depth first, then make a test pass on scrap.
On this page (8 sections)
- How do you set up a circular saw guide rail?
- How do you measure the rail offset?
- How do you secure the rail and workpiece?
- How do you make a straight cut with the guide rail?
- How do you choose a guide for a regular circular saw?
- What safety checks matter before cutting?
- What should you check if the cut drifts?
- How to use a circular saw guide rail for repeatable cuts
To use a circular saw guide rail, align its cutting edge with your marked line, secure the rail, and guide the saw’s base against it for the full cut. Confirm that the saw fits the rail, set blade depth for the material, and test the setup on scrap first.
A guide rail helps keep a circular saw on a straight path, especially across sheet goods. Accuracy depends on measuring the saw offset correctly and preventing the rail and workpiece from moving.
How do you set up a circular saw guide rail?
Place the rail so its cutting edge matches the saw blade’s path, then clamp it to a supported workpiece. Check the saw’s fit and the rail’s instructions before you start.
- Inspect the saw base and rail for damage or debris.
- Confirm the saw can sit flat and travel along the rail without catching.
- Mark the cut line and measure the saw’s blade-to-base offset.
- Position the rail to account for that offset.
- Clamp the rail and support the material and offcut.
- Set blade depth, check the cut path, and make a test pass on scrap.
Choose a rail that suits your saw and the length of the cut. Our guide to the best circular saw guide rail covers options for different setups.
Will your saw fit the rail?
The saw must sit flat and move freely along the guide. A rail designed for a particular saw may need a matching base or adapter, while a clamp-style straightedge may suit other saws.
Check the shape of the base, blade guard, and motor housing for interference. For Makita-specific options, see guide rails for Makita circular saws.
A track saw and a circular saw running beside a guide are different setups. Read how a track saw differs from a circular saw with a guide if you’re deciding between them.
How do you measure the rail offset?
Measure from the blade’s cutting edge to the side of the saw base that rides against the guide. That distance tells you how far to place the rail from the mark when the blade is on the waste side.
Unplug a corded saw or remove its battery before checking the blade position. Follow the saw manual for safe handling, and keep your hands clear of the teeth.
For a straight rail, the blade-to-base offset is usually consistent along the cut. If the rail has a splinter strip or a saw-specific edge, use the rail instructions to identify its cutting edge.
For a sheet-cutting walkthrough, see cutting plywood with a circular saw.
Make a short test cut in scrap of similar thickness. Measure the result and adjust the rail before cutting finished material.
How can you avoid measuring the wrong edge?
Use the edge that actually guides the saw, not the far side of the rail. Some guide systems include a splinter strip that indicates where the blade cuts.
For repeated parallel cuts from a board edge, compare circular saw rip guides.
Check whether the strip is new, worn, or trimmed to your saw. If its edge no longer matches the blade, recheck the offset rather than trusting the strip.
How do you secure the rail and workpiece?
Clamp the rail so it cannot slide, and support both the main piece and the offcut. The saw should travel without hitting clamps, unsupported material, or another obstruction.
Put clamps near the ends when that holds the rail securely. Keep every clamp outside the saw’s travel path, and check the full cut length before switching on the saw.
Use a stable work surface, such as foam board or sacrificial supports, that won’t shift under the material. Keep the cut area clear of cords and anything that could catch the saw.
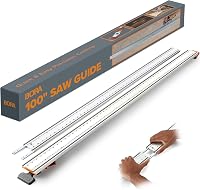
The BORA NGX guide rail combines a 50 in clamp edge with a 50 in extension, and its quick-lock clamp is designed for one-sided adjustment.
Check that the joined rail sections are straight and secure before cutting. For a shorter setup or a saw-specific track system, compare track saw adapters for circular saws.
How do you make a straight cut with the guide rail?
Start the saw with its base seated against the guide, then move at a steady pace without forcing it. Keep the base in contact with the rail from before the blade enters the material until it clears the far edge.
Set the material on stable supports and position the waste side so it can separate without pinching the blade. Follow the saw manual for starting and stopping, and keep both hands on the saw’s handles.
After the motor reaches speed, feed the saw forward at a controlled rate. If the saw slows, binds, or shifts the rail, stop and investigate rather than pushing harder.
A plunge saw with a matching rail may offer a more integrated setup. The Makita SP6000J1 kit includes a 55 in guide rail and a 12 AMP motor with variable speed control.
Use the saw’s manual for rail setup, blade depth, and plunge operation. The kit’s listed cutting capacity is 2-3/16 in at 90° and 1-9/16 in at 45°.
How do you choose a guide for a regular circular saw?
Choose a guide that supports your saw securely and gives you enough length for the cut. A rail that doesn’t fit the saw’s base or guard can shift, bind, or make alignment difficult.
The Kreg Rip-Cut uses a universal sled and edge guide. Kreg says it works best with regular side-blade circular saws whose guard or base allows the sled to clamp securely; it isn’t designed for worm-drive saws.
Check the saw’s shape before buying, especially if it has a plastic upper guard or bulky housing. The guide must clamp flat and let the saw move freely.
A rip fence is another way to guide repeated parallel cuts from a board edge. See how to use a circular saw rip fence when that is the cut you need.
What safety checks matter before cutting?
Wear eye and hearing protection, keep your hands away from the blade path, and follow the saw manual. Disconnect power before adjusting the blade or checking alignment.
Before each cut, confirm that the rail is secure, the saw base is seated, the blade depth is set, and the workpiece is supported. Keep the cord or battery clear of the cut.
Wait for the blade to stop before lifting or setting down the saw. If the cut binds or the saw kicks back, release the trigger and follow the manual’s safe stopping guidance.
For repeated crosscuts at a fixed angle, a table saw may suit the job better. Compare table saw miter gauges or crosscut sleds for table saws.
A circular saw and table saw comparison can help you choose a tool for the work.
What should you check if the cut drifts?
Stop and check rail movement, saw contact, and offset measurement before making another cut. Don’t try to correct a drifting saw by twisting it against the guide.
Look for a loose clamp, debris under the rail, or a saw base that lifts away from the track. Check that the blade is sharp and suited to the material, and confirm the workpiece isn’t pinching the cut.
If the rail is straight but the cut remains off line, repeat the offset check on scrap. A small measurement error at the setup can carry through the full cut.
How to use a circular saw guide rail for repeatable cuts
For repeatable cuts, measure the saw offset once, verify it with scrap, and secure the same rail position for each cut. Mark the waste side clearly and check that clamps and supports remain clear of the saw’s path.
Choose a saw-specific rail when the saw and track are designed to work together. For a compatible regular circular saw, a sled or clamp-edge guide can provide a straight reference; use a rip fence for cuts measured from a board edge.
If you’re comparing rail styles, start with the best circular saw guide rail, then match the choice to your saw base and cut length.
Frequently asked questions
How do you line up a circular saw guide rail?
Mark the cut line, then measure from the saw blade to the edge of its base that will ride along the rail. Position the rail so its cutting edge accounts for that offset, and check the alignment at both ends.
Make a test cut on scrap before cutting the workpiece.
Do you need to clamp a circular saw guide rail?
Clamp the rail unless its instructions specify another secure method. Even a small shift can send the cut off line or bind the blade.
Put clamps where they hold the rail firmly without entering the saw's path, then check that the workpiece and offcut are supported.
Can any circular saw use a guide rail?
No. Some rails have a saw-specific base or require a compatible adapter, while a straightedge clamp may work with more saws.
Check the saw's base, guard, and rail instructions for clearance and fit.
The saw must sit flat and move without catching.
How deep should a circular saw blade be for a guide rail cut?
Set the blade depth just deep enough to pass through the workpiece, following the saw manual. A shallow setting limits exposed blade below the material, but the saw still needs enough depth to complete the cut.
Check the setting after changing bevel angle or material thickness.