How to Use a Rockler Router Table
Using a Rockler router table starts with a secure table, the correct bit height, and a fence set for the cut. Feed the workpiece against the bit's rotation, use steady pressure, and make shallow passes.
On this page (11 sections)
- What should you prepare before using a Rockler router table?
- How do you set up the router table?
- How do you install and set the router bit?
- How do you set the fence and feather boards?
- Which direction should you feed the workpiece?
- How can you make repeatable router table cuts?
- Can a small router table handle detail work?
- How do you use dust collection with a router table?
- What should you check after routing?
- What safety mistakes should you avoid?
- What is the best way to use a Rockler router table?
Using a Rockler router table starts with a stable setup, a correctly mounted router, and a bit adjusted for the cut. Set the fence, confirm the feed direction, and make a shallow test pass before routing the final workpiece.
A router table turns a handheld router into a supported cutting setup. That can make edge profiles, grooves, rabbets, and repeated cuts easier to control, but the table does not replace careful bit selection or safe feeding.
What should you prepare before using a Rockler router table?
Prepare the router, bit, fence, workpiece, push tools, and dust collection before switching on the router. Read the instructions for your specific Rockler table and router, then make sure the table is secured to its support.
If you are still choosing a router, compare the common features in our guide to wood routers for woodworking. The router must fit the table's mounting system, and the bit shank must match the collet.
Inspect the bit for damage and clean the collet before tightening it. Insert the bit far enough for secure grip without seating it fully against the bottom of the collet.
Keep the work area clear. Remove loose clothing and jewelry, wear suitable eye and hearing protection, and wait for the bit to stop before making adjustments.
How do you set up the router table?
Set up the router table by securing the base, mounting the router, fitting the insert or opening, and attaching the fence. The surface should be stable, and the router should remain locked in position during the cut.
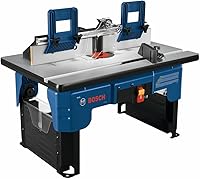
A table with a laminated MDF top can offer a smooth work surface. The BOSCH RA1141 has a 26 in. x 16-1/2 in. laminated MDF top, folding legs, onboard storage, and a 2-1/2 in. vacuum hose port.
The Bosch table is suited to readers who want a preassembled setup that stores more easily between projects. Its tall fence and 2 adjustable feather boards can help guide stock, while the starter pin and guard support curved work.
Its 15 A, 120-volt corded electric design suits a fixed workshop outlet rather than cordless routing. The 31.6 lb table is portable, but measure your storage space before choosing a folding benchtop table.
For a broader comparison, see best router table for woodworking.
How do you install and set the router bit?
Install the bit with the router unplugged, tighten the collet securely, and check that the bit does not contact the table or insert. Adjust the bit height only after the router is mounted and the power is disconnected.
Start with the bit slightly below the final cutting height. Raise it in small steps while checking the profile against a scrap piece made from the same type of stock.
A height gauge can make setup easier when your table includes one. The BOSCH RA1141 includes a bistro-height gauge for bit setup and cut precision, plus an easy click mounting system designed for mounting and removal without leveling.
Do not make a height adjustment while the router is connected to power. After setting the bit, rotate it by hand to confirm clearance, then reconnect power only when your hands and tools are away from the cutter.
How do you set the fence and feather boards?
Set the fence so the bearing or cutting edge is supported by the intended contact point, then lock it firmly. The opening should give the workpiece support without allowing unnecessary exposure to the bit.
Use feather boards when they fit the operation and do not interfere with the workpiece. They should apply steady pressure toward the fence or table while allowing the stock to move forward.
The BOSCH RA1141 has a tall fence with 2 adjustable feather boards. That setup can help control stock while you feed it, especially when the workpiece needs support against the fence.
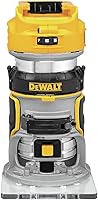
For a table that fits a different router, compare best router table for DeWalt router before buying. Router mounting systems are not interchangeable by appearance alone.
Which direction should you feed the workpiece?
Feed the workpiece against the bit's rotation, normally from right to left when you face the fence. This keeps the cutter pushing the stock toward the fence and gives you a more controlled feed.
Keep the stock flat on the table and pressed against the fence. Use both hands to guide the piece, but keep them outside the bit's path and use push blocks or other suitable aids for narrow stock.
Never climb-cut as a shortcut. Feeding in the wrong direction can pull the workpiece forward unexpectedly, so stop the router and reset the workpiece if the planned feed path feels unclear.
Make a light first pass, inspect the result, and then take another pass if material remains. Several shallow passes can give you more control than one deep cut.
How can you make repeatable router table cuts?
Make repeatable cuts by fixing the fence position, using the same bit height, and feeding each workpiece with the same support. Mark a reference face and keep that face oriented consistently against the fence.
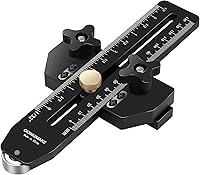
For narrow strips, a guide that controls spacing can help with repeat work. The GOINGMAKE Thin Rip Jig Table Saw Jig fits standard 3/8 in. x 3/4 in.
T slots, U-shaped slots, and 1/4 in. x 3/8 in. T slots.
This jig is designed for repetitive narrow strips as thin as 1/32 in. and is compatible with table saws, band saws, and router tables. Its 1-piece design and 490 g weight suit readers who want a dedicated guide that can move between compatible tools.
Check your table's slot shape before using it. Set the guide close to the blade or cutting path, adjust the scale, and confirm the distance with a test piece before making a batch.
Can a small router table handle detail work?
A small router table can handle light-duty detail work when the tool and table are matched to the task. It suits grooves, slots, edge work, and sanding on smaller pieces, but it is not the same as a full-size router table.
The Dremel 231 Portable Rotary Tool Router Table is an 8 in. x 6 in. attachment with a 3-way adjustable fence and a depth adjustment screw.
Choose it for compact workbench projects when you already use one of its compatible Dremel tools. It converts a compatible rotary tool into a bench-mounted wood shaper for slotting, edging, grooving, and sanding.
Its smaller work area limits the size of stock you can support comfortably. Choose a larger table when you need a tall fence, broad support, or a more stable setup for longer pieces.
How do you use dust collection with a router table?
Use dust collection when the table and router setup support it, and keep the hose away from the workpiece and moving parts. Empty or clean the collection system before routing if airflow drops.
The BOSCH RA1141 includes a 2-1/2 in. vacuum hose port. Connect a suitable hose securely, then check that the hose does not pull the table or limit your feed path.
Dust collection helps keep the cut line visible, but it does not replace eye protection or cleanup. Switch off and unplug the router before clearing packed dust near the bit or opening.
What should you check after routing?
After routing, switch off the router and wait for the bit to stop before removing the workpiece. Inspect the edge, groove, or profile, then check the bit and table for loose parts or packed dust.
Store bits clean and dry, and release router height or fence adjustments only after power is disconnected. Fold a portable table only after removing the router and clearing the surface.
If you need to compare support options, see best router table stand. A suitable stand can affect working height, stability, storage, and how easily you can reach the router controls.
For a different brand's setup sequence, read how to use a Bosch router table and how to use a Ryobi router table. The basic order stays similar, but mounting parts and adjustment methods can differ.
What safety mistakes should you avoid?
Avoid starting the router before the bit, fence, and workpiece path are checked. Keep the bit covered by the fence or guard as far as the cut allows, and never reach across a spinning cutter.
Do not force the stock through the bit. If the router slows, the workpiece binds, or the cut feels unstable, stop and review the bit height, fence setting, feed direction, and support.
Router tables are different from saw tables, so use the right setup for the tool. If you are comparing cutting tools, how does a miter saw differ from a table saw and what is the difference between a circular saw and a table saw explain the main roles.
What is the best way to use a Rockler router table?
For using a Rockler router table, choose the setup based on your work: use a full-size table for supported edge work, a thin rip guide for repeat strips, and a compact Dremel attachment for light detail routing.
The Bosch table is the most complete option here for portable benchtop routing. The GOINGMAKE jig suits repeat narrow-strip work when the slot matches, while the Dremel table is the compact choice for compatible rotary tools.
Set the bit low, make a test pass, feed against rotation, and take shallow cuts. If you need another compatible setup, compare how to use a Ryobi router table before adapting instructions from a different mounting system.
Frequently asked questions
How do you set up a Rockler router table?
Secure the table, mount the router, install the bit, set the height, and align the fence before routing. Check that the bit is tight, the workpiece has support, and the feed path is clear.
Make a test cut on scrap before cutting the project piece.
Which direction should you feed wood on a router table?
Feed the workpiece against the bit's rotation, normally from right to left when facing the fence. This keeps the cutter pushing the workpiece toward the fence instead of pulling it away.
Keep both hands clear of the bit and use feather boards when suitable.
How deep should a router table cut be?
Set the cutting depth for the operation and use shallow passes when removing a lot of material. A light first pass gives you a way to check the profile, fence position, and feed control before taking the final pass.
Can you use a router table for curved work?
Yes, a router table can guide curved work when the setup includes suitable support and control. A starter pin and guard can help with curved work on a compatible table.
Keep the piece firmly supported and follow the router and table instructions.